Hello friends, SBI has updated Yono app recently and
they give the facility of fingerprint login for their quick services. Therefore
we are discussing on how to enable fingerprint in Yono SBI.
By login using fingerprint in Yono SBI you will get
the facility of view balance and the last transactions list, scan and pay, bill
payment, pay to contacts, pay to bank account etc. If you are also searching
for how to enable biometrics in Yono SBI follow the following steps to know the
process.
How
to enable fingerprint authentication in Yono SBI:
Before going to enable fingerprint login in yono SBI
you should have the MPIN of Yono app handy. You should also update the Yono app
if you have not updated recently. If you remember the Yono SBI login MPIN then
follow the following steps.
STEP
1:
Go to your mobile and open Yono SBI mobile application.
STEP
2:
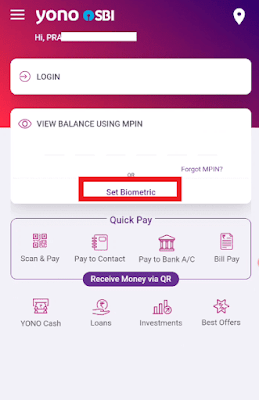
Now you are on the login page of Yono SBI account. On the login page you will
see an option ‘View Balance’ and another option ‘Set Biometrics’ under the ‘view
balance’. Click on this option here.
STEP
3:
A pop up message will be displayed. It says ‘You can enable biometric
authentication for quick access for these services view balance, pay to
contacts, pay to bank A/C and scan and pay. Do you want to enable it now? Click
on ‘Yes’ button here.
STEP4:
As you click on ‘Yes’ button you are asked to enter Yono SBI login PIN to login
in your account. Enter your PIN to and login to your account.
STEP
5:
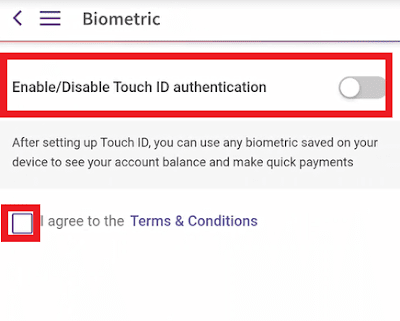
You will be redirected to Biometric page. Here you will see a biometric enable/
disable button. Enable the button accept the terms and conditions. Finally click
on ‘submit’.
STEP
6:
Another message will be displayed. In this message it says ‘Please ensure that
any third party(s)’s finger print or face is not registered in your mobile device,
as by such registration, the third party(s) will be able to access your Yono
SBI mobile app’. Select OK to proceed.
STEP
7:
An OTP will be received on the registered mobile number, enter the OTP and
click on submit. Touchpad authentication will be enabled successfully.
You can now watch the following video to know the
above process. Because of we are also described this process on the following
video also.


.jpg)


0 Comments