Hello friends,
in this blog we are going to discuss about how to start SIP in SBI mutual fund
online in existing portfolio. If you are a SBI mutual fund customer and you are
investing SBI mutual fund and you want to start another SIP under the same
portfolio and same fund then how can you invest.
If you are
searching for that topic then you can read this article till end. In this
article we are discussing how to invest in the same mutual fund in which you
have been investing for a long time.
How to start SIP in SBI mutual fund under existing
portfolio:
Before going to
invest SBI mutual fund on your existing fund you have to register on SBI mutual
fund online portal and link your mutual fund in online account. If you have
already started SBI mutual fund online then follow the following steps.
STEP 1: Go to SBI mutual fund motile app ‘InvesTap’ and login to your account.
STEP 2: As you login to your account you will see your fund balance, absolute
return, folio number, current value etc. You will also see a three line option
on near the folio number. Click on this three line option.
STEP 3: As you click on the three line another some options details, buy,
switch, redeem, STP, SWP etc. options will be displayed. Click on the option
‘Buy’.
STEP 4: You will be redirected to buying page. In this page you will see your
portfolio, your name, investment details etc. Select the investment details as
SIP, enter investment frequency, installment amount, start date of SIP and end
date of SIP.
Here you will
see an option ‘until cancel’ option. Trick the box before this option. And
thereafter click on ‘Proceed to’.
STEP 5: In this step you need to select your account number. You will find your
account number which you have already added at the time of folio creation.
Select your account number from the drop down menu.
You will see two
mode of investment. One is ‘One time mandate’ and the other is ‘Internet Biller’.
Select ‘Internet Biller here.
Now trick on the
box before ‘I have read the terms and conditions’ term and click on ‘Submit’.
STEP 6: Once your selected details will be appeared on the screen. You have to
check and confirm the page. Hence click on ‘Confirm’.
STEP 7: As you click on the ‘confirm’ button on the above step you will be
redirected to payment status page. In this page you will see a Unique
Registration Number (URN) and your investment fund details. Note down this URN
and you need to add this URN on your Bank’s internet banking biller page.
Now to complete
the start SIP process we will go SBI Yono Lite app add this URN as biller.
Bellow we discussed the steps.
How to add SBI SIP URN number to SBI biller:
You can add the
above URN as biller through SBI internet banking, Yono Lite app and Yono app.
Here we will go through SBI Yono Lite app.
STEP 1: Open SBI Yono lite app and login to your account.
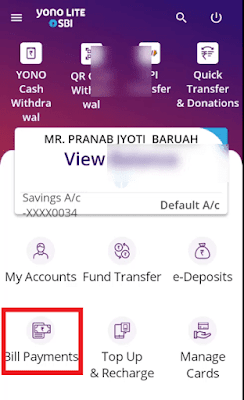
STEP 2: Click on the ‘bill payments’ icon on the dashboard of your account.
STEP 3: A new page will be appeared. Here you will find a list of various
options. Click on the option ‘Add billers’ out of them.
STEP 4: Now select biller location as national, biller category as mutual fund,
biller name as SBI mutual fund, enter a nick name of as you like between 3 to 6
characters, enter the URN number.
Then turn ‘ON’
the auto pay option so that the payment will be done automatically on your
selected date every month.
As you turn on
the auto pay option you are asked to enter auto pay limit. Enter the limit of
auto pay as equal as or greater than your SIP installment.
Now select the
debited account and finally click on ‘Register’.
STEP 5: The selected derails will be appeared once again on the next page.
Check the details and click on ‘confirm’. If anything was wrong then you can
cancel it by clicking on ‘cancel’ button.
STEP 6: An OTP will be sent to your registered mobile number with bank. Enter
the OTP and ‘Submit’. Now the biller added successfully message will be
appeared.
This is the
complete process how to invest in existing portfolio in SBI mutual fund online.
You can watch the all above steps on the following video. Now watch the video.


0 Comments