Friends, in this
article we are discussing on the topic how to enable fingerprint login in Yono
SBI. Actually sometimes we on very hurry in such time if we need to login Yono
SBI then we can easily login with fingerprint. But if you logged in with
fingerprint then you can use minimum facilities of Yono SBI.
However SBI
offers fingerprint login facility to their customers. By using biometric login
Yono SBI you can use quick transfer and balance check services. By quick
transfer service you can transfer money up to rupees 25000 in a day.
If you enable fingerprint
in Yono SBI then some risks factor also there. Suppose you have registered
biometrics in your phone for another person also. In such condition if you
enable biometric login in Yono application then that person can also access
your Yono account.
In the following
paragraphs we are discussing step by step process of how to enable fingerprint
in Yono SBI.
How to enable fingerprint login in Yono SBI:
Before going to
enable fingerprint authentication in Yono SBI you must have registered in Yon
SBI. If not, register before going to start Yono biometric authentication. Now
follow the following steps.
STEP 1: Go to your motile and logged in to Yono SBI mobile application.
STEP 2: Now you are logged in to your SBI account. In this page on the top
right side of the page you will find a three line menu option. Click on this
option.
STEP 3: A list of some other options will be displayed on the screen. From the
list of options find the option ‘Service request’. Click on this ‘service
request’ option.
STEP 4: You will be redirected to service request page. Here you will see an
‘Settings’ icon. Click on the settings option on this page.
STEP 5: Now you are on the ‘Settings’ page of your account. Here you will find
various settings options. Out of them click on the option ‘Enable/ Disable
biometric for Yono access’.
STEP 6: As you click on ‘enable / disable biometric for Yono access’ on the
above step you will be redirected to biometric page. In this page first you
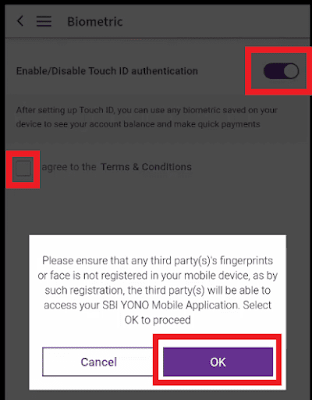
have to on ‘enable / disable touch Id authentication’ button.
Here one message
also displayed under the touch Id authentication button. It says ‘after
settings up touch Id you can use any biometric saved in your device to see your
account balance and make quick payments’. Turn on the touch Id authentication
button here.
STEP 7: A pop up message will be displayed on the screen it says ‘please ensure
that any third party fingerprint or face detection is not save on your device,
as by such registration the third party (s) will be able to access to SBI Yono
mobile application’. Click on ‘OK’ button here.
Now agree the
terms and conditions, finally click on ‘submit’ button.
STEP 8: In this
step you have to touch your fingerprint sensor. An OTP will be send to your
registered mobile number. Enter the OTP here and click on ‘submit’.
STEP 9: as you
submit the OTP a pop up message will appear again and it says ‘touch Id has been
enabled’. Now you can use fingerprint login to your Yono SBI app.
This is the
process how to enable fingerprint in Yono SBI. You can also watch this process
on the following video. Watch this video to better understand the process.


0 Comments