Hi friends, in this blog we discuss
about “how to e-verify ITR through SBI internet banking”. People while file an
income tax return they need to verify their income tax return online or
offline. Without verify your return the process of ITR filing will not be
completed. You can verify the return online by two ways the first one is
through Aadhaar OTP and the other is through internet banking.
If you want don’t go through online
verification then you have to take print out of form - V and need to send it to
CPC Bengaluru. But it takes many times to verify the return. Hence the best
option of verify income tax return is online.
If anyone wish to e-verify income tax
return through Aadhaar OTP then he will receive OTP on mobile. Many times people
do not have the registered mobile number with Aadhaar on their hand. In that
condition they will not receive the Aadhaar OTP which is sent to verify ITR
online. Then they can’t e-verify their return online. Here they can go for the
second option. They can e-verify ITR through internet banking.
If you are using internet banking of
any bank then you can easily e-verify ITR. So we discuss here the steps to
e-verify ITR through SBI net Banking.
How
to e-verify ITR through SBI internet banking: To do e-verification of ITR
through SBI net banking you need to registered with SBI net banking first. To
know how to e-verify ITR through SBI net banking follow the following steps.
STEP
1: Go to SBI internet banking page and login with your user ID and
password. After login to your account you will find an option ‘e-TAX’. Click on
this option.
STEP
2: After click on ‘e-tax’ another page will open where some new options
will be displayed. Click on the option “login to e-filing/e-verify” here.
STEP 3: In this step you are redirected to a page where you will find your savings bank account number. You have to select your account number here. Now click on the “submit” button.
STEP
4: An OTP will be sent to your registered mobile number with SBI. Enter the
OTP on this page and click on ‘confirm’.
STEP
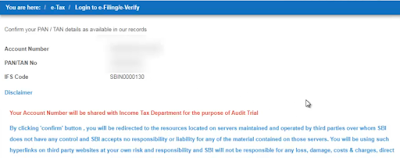
5: Now you will reach to another page. Here you will see your account
number, PAN number and IFSC code of your branch. You will also see the some
instructions on this page. Read all the instructions carefully and click on
“confirm”.
STEP
6: Here you are redirected to income tax India’s account. A pop up massage
will displayed saying that you have not update your contact details, please
update them. Click on the option continue. Then the pop up window will go away.
You will see an option “Skip” on the bottom of the page, click on this option.
STEP
7: In this step again another pop up massage will displayed it ask you whether
you want to add this account number pre-validate account list. If you wish to
add the account number then click on “confirm” otherwise click on “cancel”.
STEP
8: Now you will see the dash board of your income tax account. Here you
find tow options in red colour. Click on the option “view return forms”.
STEP
9: Here your PAN number will displayed. You have to select ‘income tax
return’ from the drop down menu and click on ‘submit’.
STEP
10: In this page you will see the list of ITR of previous years and current
year. You will also see an option “click here to view returns pending for
e-verification”. Click on this option.
STEP
11: A new page will open. You will find the returns pending for “e-verification”.
An option “e-verify” against the return will be seen. Click on this option. A pop up massage will
open. It displayed you an acknowledgement number. It says that if you click on
the ‘continue’ option then an EVC will generate automatically and applied to
the return. You need not send ITR V form to CPC Bengaluru. Click on the ‘Continue’ option.
STEP
12: In this page an massage will be displayed saying that “Return
successfully e-verified”.
If you want to see the above steps
through video then watch the following video.


0 Comments